Gain important tips from the guides and staff at Mountain Trek. Improve your health, wellness and increase weight loss with these helpful tips and ideas.

Posts

Happy Hikes: Choosing and fitting your backpack

Fitting the right backpack for you
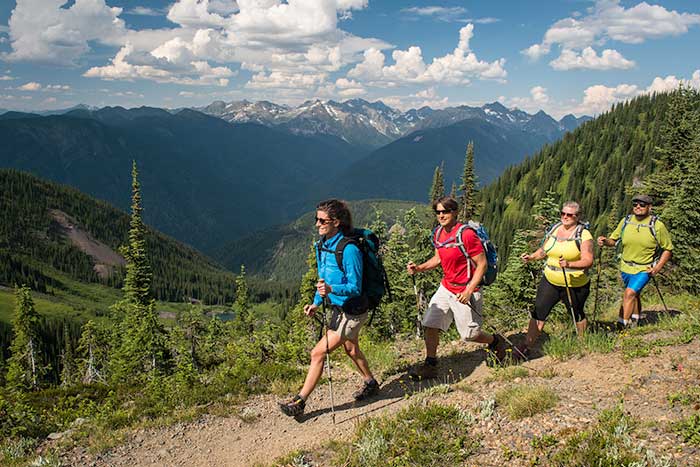
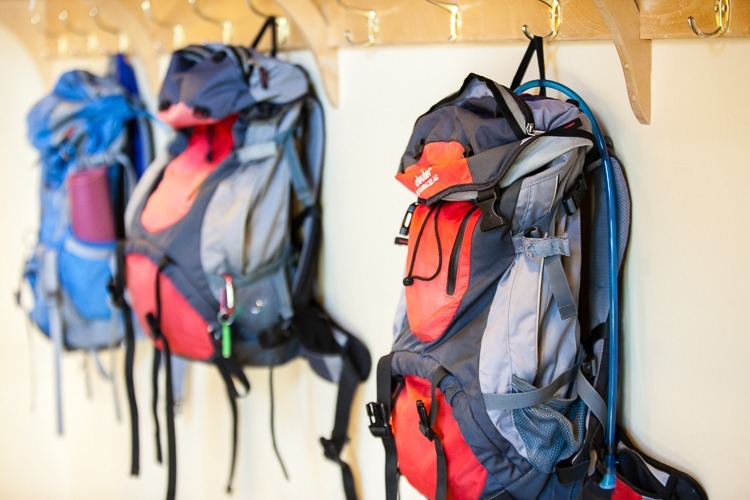
One of the keys to a happy hike is having a well-fitting backpack. It’s hard to enjoy breath-taking views and outdoor activity if you feel like you’re hunched over giving a piggyback ride, or at all in pain. A good pack is absolutely essential hiking gear for storing your water, healthy snacks, an extra layer, and among other things. And as the spring and summer season gear up, so should we with all the right gear for our outdoor pursuits.

But the choices for this essential bit of kit can be absolutely overwhelming. How do we choose what size, design and suspension system of pack, and how do we ensure it fits correctly? In beginning this important deciding process, consider what terrain you’ll be visiting, your activity, the volume of what you’ll be carrying, and approximate weight. Here is a guide to help out when selecting your travel partner for the trails.

Sizes of Pack

Different volumes (measured in Litres) of pack are available for different activities and body sizes.

The day pack (15-35 Litres) as the name suggests, is perfect for the small outing or day hike. With little structure or frame if any, your load is supported by shoulder straps. A waist belt helps to keep everything centered. The alpine pack (35-55 Litres) is the perfect size for overnight jaunts, or day trips where you may need a little more equipment. Weight here is beared a little more on the hipbelt. A backpacking pack (55 – 75 Litres) is designed for multi-day trips, these packs have an internal structure to help with support, and do take some of the weight off the shoulders/back and onto the hips. The expedition packs (75 Litres +) are again, as the name suggests, designed for serious expeditions.

Pack Construction

Your backpacks take a lot of abuse on the trail, being thrown down, hoisted up, and possibly even be used as a seat. You need to make sure your pack will stand up to the stress and will last a long while. Check for a durable material, especially in high use areas on the pack; chunky, good quality zippers; and tightly stitched seams that are bar-tacked at stress points.

Suspension

The purpose of pack suspension is to comfortably transfer weight to the hips and is comprised of several aspects of the pack. Shoulder straps should be designed to bear around 30% of your pack weight and should be relatively firm, yet padded. In no way should the shoulder straps pinch or chafe. Your hipbelt stabilizes the whole weight of your pack by keeping it in place, and for larger packs is the main weight-bearing area. Adjusting the suspension system to your body is imperative for a good fit. So how to fit your pack?

How to fit your pack

The first step to fitting your pack is determining your back or torso length. The size of the pack is based, on this, and not the overall size or height of the person. Find your c7 vertebra or the bump at the top of the spine/back of the neck. Tilting your head forward will allow you to find your c7 more easily. This is the top point of your measurement. Next, place your hands on your hips, fingers forward and thumbs back. This is the shelf upon which your pack will rest. Measure between these two points for your torso length, thereby determining your pack size; XS, S, M, L, etc. Keep in mind that each manufacturer’s sizing is different, so you want to use your torso length, not pack size after one measurement.

After determining your size of pack, put a bit of weight in the pack for sizing, maybe 10 – 20 pounds. Putting the straps on, settle the pack on your back, then secure the hipbelt directly over your hip ‘shelf’. The hipbelt pads should be snug enough that they are secure over the hip bones. Next, adjust your shoulder straps so that they are not touching your armpits, and are not pinching your neck. Secure your sternum strap. Last, have a walk around with your pack and adjust anything that feels unbalanced. A well-fitted pack will feel simply like you are a little heavier, like an extension of your own body, rather than something ‘on’ you. Keep in mind, if it doesn’t feel good in the initial stages, it definitely won’t feel good after hours on the trail. If in doubt; feel free to use the help of the knowledgeable staff at your local outdoor store!

How to pack your pack

Where weight is distributed in your pack will be huge for your body’s overall comfort and ability to last on the trail. Heaviest items should be placed closest to the back, with bulkier, lighter items on the bottom, outside, and top of the pack. Having a bottom-heavy pack will make you feel like you’re being dragged down, and a top heavy pack may make you feel like you’re about to topple over. Having those heavier items the closest to you will feel the most natural for your centre of gravity. Distributing weight evenly over the right and left sides will help a lot with your comfort too.

With these tips in mind, we hope you’ve found it helpful and motivating to get out there and hit the trail with your most important piece of equipment. Happy fitting and happy packing!


What is Mountain Trek?

Mountain Trek is the health reset you’ve been looking for. Our award-winning health retreat, immersed in the lush nature of British Columbia, will help you detox, unplug, recharge, and roll back years of stress and unhealthy habits. To learn more about the retreat, and how we can help you reset your health, please email us at info@mountaintrek.com or reach out below:

Trekking Poles: How to choose the right poles for you

hiking poles lined up on a wall

It’s important to have the right gear to support you in having the most fun, safe, and effective workout possible. At Mountain Trek, we include trekking poles in necessary hiking gear, as do many avid hikers around the world. But like any good gear, it is so important to find what works best for you. Here, we’ll help you to choose the best hiking pole for you by covering what features to look for. But first; why bother using them?

line of 4 adults hiking with poles in beautiful mountain scenery

Why use hiking poles?

Using walking/hiking poles offers several benefits:

  • Poles provide better balance and footing, especially over slippery or uneven terrain, like when crossing streams, over loose rocks, etc.
  • During ascent, poles can add thrust, while taking pressure off the lower body, and onto the shoulders and upper back.
  • During descent, poles can significantly reduce the amount of stress on legs, hips, and joints, and reduce the possibility of injury by adding stability. Although this is particularly beneficial to those with weaker or compromised knees/ankles, reducing stress and impact to the body is certainly beneficial for everyone.
  • Poles can be used to clear away loose hanging vegetation, or can be used to scope out swampy patches or possible holes before venturing forwards.
  • In the unlikely event of an injury, a pole can be used in wilderness first aid as a splint or crutch.
  • And last but not least, using hiking poles not only reduces your perceived exertion rate by taking strain off the legs and into the arms, but increases calories burned. In a study by the Cooper Institute of Dallas, they found that using trekking poles burned up to 20% more calories compared to the same walk or hike without poles.

Woman admiring and inspecting hiking poles

What features should I look for in a hiking pole?

When shopping for a hiking pole, consider the kind of terrain you will be traversing, and how much weight you will have in your pack. Also review the health of your knees, ankles, hips, and joints.

Regular or Anti-Shock

With this determined, you can decide if you would like to get ‘regular’ or ‘anti-shock’ poles. Anti-shock poles have a shaft that contains an anti-shock spring mechanism, softening any impact while travelling downhill. Anti-shock technology is particularly beneficial for those with sensitive knees, ankles, joints, etc. And the anti-shock mechanism can be turned off when it is not needed; for example when traveling uphill. Regular or standard poles have a simple shaft, and are a little bit lighter than antishock poles since they do not contain that mechanism. They of course are unable to provide the same level of shock absorption as an anti-shock model, but do provide the same stability.

The parts of a pole include the tip, basket, shaft (which includes or does not include the anti-shock device), locking mechanism, grip, and wrist strap. When choosing a hiking pole, consider each of these components:

Material

The shaft’s make up will likely be either high-grade aluminum or carbon fibre. A pair of high-grade aluminum poles will weigh around 20 ounces, are very durable and flexible, and rarely break. Carbon fibre poles will weigh less on average, about 15 ounces, and are also very durable. But when carbon fibre poles are under extreme stress, they can shatter. Keep in mind that both the length and the circumference of the shaft varies as well.

Pole tips are usually made out of carbide or steel. Additionally, there is and option of getting a rubber tip cover. This protects the lifetime, and your pack when the poles are stowed. The rubber ends are also better for harder surfaces, like pavement.

Locking Mechanisms

Locking mechanisms allow you to determine the length of your pole for different terrain, or for stowing in your luggage en route to your hiking destination. Two or three interlocking sections make up your pole. And if you’re very tall or short, it’s important to check the full extension/compression length of the pole. Most poles have a ‘twist and lock’ system, like a form of clamp. Whatever the mechanism, ensure it’s durable and dependable – you’d hate to have this fail on you at a critical moment. Regular maintenance through cleaning and drying of the separate components of your hiking poles can help with your locking mechanism’s life span and reliability.

Grip

Both the grip shape and material vary, so this is a very important reason to test drive your poles before buying. Test different grip types to see what angle and density is most comfortable to you. Grips can be angled forward or completely upright, and some can even extend down the shaft, known as an ‘extended grip’, useful for brief uphill portions. Materials for the grip can include, but are not limited to:

Cork – absorbs vibration well, doesn’t slip with sweat, conforms well to hand shape

Foam – absorbs sweat, most malleable

Rubber – can chafe hands in warm weather but insulates from cold, good shock absorption).

Now that you’ve chosen your hiking poles, ensure you have the correct technique to keep you safe and supported. Or come to Mountain Trek and we’ll show you how–you’ll get lots of practice! Be supported, less prone to injury, and burning more calories out there on the trail with your new hiking poles. And most importantly, have fun!


What is Mountain Trek?

Mountain Trek is the health reset you’ve been looking for. Our award-winning retreat, immersed in the lush nature of British Columbia, will help you unplug, recharge, and roll back years of stress and unhealthy habits. To learn more about the retreat, and how we can help you reset your health, please email us at info@mountaintrek.com or reach out below:

Feeling Vitamin D-ficient? How to top up on the Sunshine Vitamin this Winter

a woman dressed warmly in front of a winter sceneIn the middle of winter, are you feeling a little low on energy? Could be that you’ve come to your ‘D-day’, a time in the year when your Vitamin D is at an all-time low. But the good news is, this is easy to top up with a high-quality multi-vitamin and some delicious nutrient-rich foods!

Vitamin D, necessary for healthy bone density, calcium absorption, and even depression prevention, is provided naturally to us in two main ways: by the sun’s UV rays, and through our diet. Yet, in these winter months when the sun is low in the sky and usually cloud-covered, most of us aren’t getting enough of the sunshine vitamin. By the time spring rolls around, many of us are Vitamin D deficient. To help us stay topped up on this important player in the body’s functioning health, we’ve taken a look at what foods we can incorporate into our diet to get this necessary nutrient. But first, why exactly is Vitamin D so essential?

Related Article: Mother Nature is the Pill for Health

Why is Vitamin D so important?

Often correctly associated with bone health, Vitamin D does a lot more for our overall health and body function than it’s usually given credit for. In addition to being absolutely necessary for bone growth and repair, Vitamin D also aids calcium absorption in the gut, is responsible for the modulation of cell growth, neuromuscular and immune system function, and reduction of inflammation. No question that this Vitamin’s role is crucial to our body’s functioning health!

Where can I get my Vitamin D?

When UV rays from sunlight touch the skin, this triggers Vitamin D synthesis. But when sun exposure is at a minimum during the winter months, we can turn to diet to help with our vitamin D intake. Unfortunately, very few foods are high in Vitamin D naturally, and so it is not possible to get all the Vitamin D you need from diet alone. In conjunction with a high quality multi-vitamin and UV exposure (in moderate amounts, where possible), here are some of the best food sources of Vitamin D:

Fatty fish

So very nutritious for you for so many reasons; fish such as salmon, mackerel, and sardines, and even seafood such as oysters, contain some of the highest concentrations of Vitamin D in food.

Eggs

Not only high in protein and so many other nutrients (Vitamin B12), the sunshine yellow of egg yolks do contain a hearty helping of Vitamin D.

Beef liver

Not everyone’s favorite, but when mom said ‘eat up!’ to those liver and onions, she knew what she was talking about as far as Vitamin D’s concerned.

Mushrooms

Certain varieties of mushrooms, like white-button, can provide Vitamin D among other nutrients (Vitamin B5) when lightly cooked.

Many foods are fortified with Vitamin D for the simple reason that we don’t get enough in our diet, or in general. Almost all milk (and baby formula) in the U.S. and Canada is fortified with Vitamin D. Please note that dairy products (cheese, yogurt, etc.) are not usually fortified with Vitamin D like milk. Some orange juices, soy products, and cereals are often fortified with many supplements such as Vitamin D, but please use caution and check labels, as many of these products can contain refined sugars, hydrogenated oils, and other undesirables.

Although there is no substitute for sunshine, we can always help ourselves with high-quality supplements, and delicious, nutritious food! We wish you a wonderful, healthy rest of winter. And when the sun does come out on those beautiful frosty days, don’t forget to go enjoy yourself outdoors for that dose of Vitamin D!


What is Mountain Trek?

Mountain Trek is the health reset you’ve been looking for. Our award-winning health retreat, immersed in the lush nature of British Columbia, will help you detox, unplug, recharge, and roll back years of stress and unhealthy habits. To learn more about the retreat, and how we can help you reset your health, please email us at info@mountaintrek.com or reach out below:

Not Another Passing Fad: Health and Fitness Trends for 2014

Top Trends for Fitness in 2014Trends, unlike fads, are cultural flows or tendencies. Fads pass and often with nothing more than surface style or quick money in mind.

Think of pop star Miley Cyrus and twerking, a dance she recently popularized in which an individual dances in a sexually provocative manner involving thrusting hip movements while in a low squatting stance. Sure twerking raises the heart rate, burns calories, works certain muscle groups, and adds fun to fitness, but it will never become more than a passing fad. Like the Charleston dance of the 1920s, lava lamps in the 70s, Rap-Rock music of the 90s, or Segway scooters in the early 2000s, Miley’s dance will soon be relegated to pop culture’s, dusty half-price bin.

Mountain Trek pays no attention to passing fads. Instead we invest our time and energy into researching which new or revived trend is synonymous with the healthiest, happiest, most inspiring lifestyle possible.

Go ahead and twerk all you want, but the following is a list of what we’ve found to be the biggest trends in health and fitness for 2014.

Metabolism Boosting Exercises: Renowned personal trainer Jillian Michaels, predicts that high intensity interval training (HIIT), a trend popular in 2013 will continue on throughout 2014. “Current research suggests that HIIT is the best way to achieve training improvements and body change results,” she says. “Programs that challenge the body to incur a higher calorie burn during and post-workout (after burn) by using a variety of total body training methodologies will prove to be winners when it comes to game changing workouts.”

Corrective Exercises: How many of us suffer from chronic low-back pain, arthritis, neck or shoulder issues? The growing number of people who experience aches and pains on a regular basis has inspired a movement in the world of personal trainers to help their clients by using corrective exercise techniques for pain management and postural issues.

In many cases, the pain you’re experiencing now is often the result of a series of small events that, when looked at as a whole, leads to the real reason you’re experiencing pain. Muscle imbalance and movement issues are often the root cause of chronic pain.
The idea behind corrective exercise is to use simple exercises that address any muscle imbalances and misalignments and relieve the stress in your body.

Corrective exercise is based on the simple fact that each muscle is connected to another. By reintroducing proper structure in the body, structure can improve and you can move freely and with less pain as time goes by.

Digital Wellness: Most of us are shackled in one way or another to our digital gadgetry, whether it’s cell phones, laptop computers, or tablets. And even though there is a growing trend toward people living tech-free lives (or at least dedicating one day a week to this lofty goal), there is an even bigger trend toward digital tech wellness. From fitness tracker apps that monitor everything from caloric intake to heart rate and running distance, to online fitness classes, the mobile health movement is here to stay.

Brainpower Boosters: Another trend that was big in 2013–exercise that incorporates cognition-building challenges and specific movement patterns to improve brain function–will also fuel 2014’s fitness devotees.

We’ll see more experiential fitness classes that involve an elevated approach to the mind-body-brain connection. A yoga-flow-play class, that offers a music sampling experience and explores how certain vibrations and sounds impact yoga flow and poses, is one example.

Brain-boosting exercise may sound complex, but it can be as simple as working on your balance or coordination

Good Old-Fashioned Hot Springs: Soaking in a natural hot spring is something that humans have been experiencing for thousands of years. It is in fact our original spa encounter.

With today’s rising costs of living, an inexpensive, social and therapeutically beneficial soak in a thermal spring is hotter than ever. And the best part is, you can find a natural hot springs all over the world.

Nutritious Food: Will good, nutritious food ever not be a trend? We don’t think so, and neither does Sandy Todd Webster, editor in chief for the IDEA Health and Fitness Association. She says, “Empowering people to break the chain of crazy fad/yo-yo dieting by educating them to eat sensibly is an immeasurable benefit. If you can teach a person how to eat well and stop putting unnecessary additives and chemicals into the body, their system will breathe a sigh of relief and start metabolizing the way it’s meant to. It will finally recognize the ‘information’ they’re putting in rather than getting inflamed and fighting unrecognizable processed substances.”

Wellness Spas and Retreats: With the recession now in our rear-view mirror, many people are beginning to travel and spend again. Destination spas and health retreats, like Mountain Trek’s Nelson, British Columbia and Baja Mexico (Rancho La Puerta) locations specialize in what increasing numbers of people are seeking out in 2014– personalized, transformative and immersive wellness programs.

Holiday Health and Fitness Challenge: a wholesome head start for 2014

[portfolio_slideshow id=6078] A hearty congratulations are in order to us all. We made it through the toughest, most temptation-filled, overindulgent part of the holidays!

Sure, there’s still one more epic night of jubilation, but New Year’s Eve is less about stuffing ourselves with delicious food, and more about celebrating (with possibly one-too-many drinks) what was hopefully a healthy, happy and bountiful 2013, while wishing the best to each other for the year ahead.

As we start thinking about our resolutions for 2014–whether it’s quitting smoking, eating healthier, exercising more, or a host of other healthy lifestyle improvements–now is a good time to also start taking the initial steps towards achieving those resolutions. Why wait until January 2nd to reboot a healthy lifestyle?

Whether you’re still scuttling between the final few office parties and family gatherings, or you’re on a sun-filled vacation, Mountain Trek has come up with a manageable way to reset your perspective and kick start a fresh, healthier you.

Join us for our Holiday Health and Fitness Challenge– seven days of effective tasks to improve your overall health. Complete the challenge and we think you’ll find that sticking to your New Year’s resolutions will be that much easier.

We’d love to hear about your experience during the Holiday Health and Fitness Challenge. Keep us posted on your progress, the hurdles that you face and how you feel at the end. Good luck!

December 29, 2013: 
Day One: CORE

Challenge: We start our challenge by focusing on our core. Functional movements are highly dependent on the core, and lack of core development can result in a predisposition to injury. The major muscles of the core reside in the area of the belly and the mid and lower back, and peripherally include the hips, the shoulders and the neck.

Task: There are many core-strengthening exercises you can do, from knee fold tucks, to ball routines, to plank exercises. Find a few that you feel comfortable with and try them out at some point today.

December 30, 2013: 
Day Two: DETOX

Challenge: Our lifestyles put our bodies to the test. Rising stress levels, lack of exercise, constipation, poor diet and poor lifestyle choices – not to mention the ever-increasing levels of toxins in our environment – push our bodies to their limits. While it’s impossible to avoid toxins completely, it’s important to support your body so it can get rid of them.

Task: Today we challenge you to an infrared sauna. An infrared sauna uses infrared heaters to emit infrared light experienced as radiant heat, which is absorbed by the surface of the skin. Taking a 20-minute infrared sauna is a great way to sweat out toxins, with a side benefit of weight loss.

December 31, 2013:
Day Three: NUTRITION

Challenge: Today we want you to eat breakfast. And not only that, we want you to eat breakfast within a half hour of waking up. So many of us skip breakfast altogether. Not today. Eating breakfast kick starts our metabolism, supports our circadian rhythms and keeps our livers from initiating the “famine” response.

Task: Make yourself a fruit and veggie smoothie (or prepare it the night before and keep it in the fridge), enjoy a bowl of muesli, scrambled eggs, or broccoli and smoked cheese frittata in the morning. Whatever your choice try and include equal volumes of complex carbohydrates, protein, vegetables or fruit, as well as a teaspoon of omega oil.

January 1st, 2014:
Day Four: SLEEP

Challenge: This one shouldn’t be too much of a challenge, especially if you’ve been up celebrating the night before.
As an adult, our being needs between 7.5 and 9 hours of sleep in a 24 hour period, in order to maintain a healthy, growth-centered metabolism.

Task: The challenge on this night is to go to bed early (get cozy in bed between 9 and 10pm) and sleep relatively undisturbed for 7 to 9 hours.
If, like so many of us, you spend too many hours on your computer, download justgetflux.com. During the day, computer screens look good—they’re designed to look like the sun. But, at 9PM, 10PM, or 3AM, you probably shouldn’t be looking at the sun. The f.lux software fixes this: it makes the color of your computer’s display adapt to the time of day, warm at night and like sunlight during the day.

Have a good night…

January 2nd, 2014
Day Five: STRESS

Challenge: For some of us, today’s challenge may be the toughest… a gadgetry detox. Try one full day without a technological gadget or social media platform that usually has you so absorbed in it that you feel a sense of panic when that thing is temporarily taken a way from you.

Always being available to answer an email or take a call from someone at work has made our workdays 10 to 14 hours long (in some cases longer).

Task: Just for today, turn it all off! Your heart rate just went up didn’t it? You’ll be okay.

If it’s absolutely not possible to turn it all off, try one gadget at a time. Turn off your cell phone, or try no emailing, or no television, or no Facebook, Twitter or Instagram. And substitute the dopamine fix that you usually get from the gadgets, with a healthy dopamine boost. Shut your cell off, go for a hike. Substitute a no-social-media-day with a day of visiting friends and family. Turn it all off and fill your day with yoga, meditation, and healthy cooking.

 January 3rd, 2014
Day Six: WILLPOWER

Challenge: Admittedly, if you successfully went through a gadget detox the day before, then your willpower is on the right track. But now it’s time to strengthen it even more, because today is the day you engage one of your resolutions for 2014.

Task: Pick a healthy habit and embrace it. Today is the day you start yoga classes, or begin healthy cooking classes, or reconnect with an estranged loved one, start writing that novel you’ve always wanted or find some way to love yourself a little more every day. Whatever it is, seize the day with open arms, open mind and open heart.

January 4th, 2014
Day Seven: NATURE

Challenge: Has it been a while since you’ve explored and enjoyed the great outdoors?  On this, the final day of our Heath and Fitness Challenge, we urge you to get outside and play. We don’t need science to tell us that doing some form of healthy activity outdoors is good for the soul.

Task: Take your dog for a long walk along the beach, go for a hike with your son, snowshoe with your daughters, cross-country ski with an old friend, swim in the ocean with your spouse, stroll through the neighbourhood with your grandchild, or ride bikes with your mom. Whatever it is, get out there, breath the fresh air and be thankful that you’ve made it another year!

Once again, let us know how you do, we’d love to hear from you and good luck!

Embracing an Attitude of Gratitude

thank you written in tiles on a wooden table with a hand holding a heart tile

A steaming hot mug of peppermint tea. Sharing a good laugh with your best friend on the phone. Going for a hike on a crisp, clear, fall day. Thanksgiving; a time to reflect on all we have to be thankful for! But is putting gratitude on the calendar one day a year enough to embrace this attitude?

In a recent study, two groups of people were asked to journal 5 things each day over a two week period: group one, 5 things for which they were grateful, and group two, 5 things that were a hassle. The benefits for those who jotted down their daily appreciation were clear. These grateful people showed more alertness, optimism, enthusiasm, energy, and determination. They showed lower cortisol (stress hormone) levels, lower blood pressure, and reported less depression, better sleep, and a higher likelihood of achieving personal goals. Not to mention the positive impact on the way they think and feel! In essence: expressing gratitude regularly contributes to overall happiness in a big way.

Seems like recognizing our blessings is a worthwhile activity! But how can we go about feeling and showing our thanks? Here are some simple ideas to get your attitude of gratitude flowing.

How to Make Space for Gratitude

Gratitude Journal

Just like Oprah suggested way back when, get yourself a journal, and as a great addition to your morning or evening ritual, jot down 5 (or more!) things for which you are grateful. This gratitude can be for ANYTHING, big or small! Your loving partner, the particularly delicious apple you ate earlier, existence, the kind smile from the old lady in the line up at the grocery store, anything. If you’re short on time, this needn’t be a hassle – keep a small notebook with you, and in those in between moments when you’re waiting for your dentist appointment or your daughter’s Judo lesson to wrap up, make that time count by writing some notes of thanks.

Gratitude Rock

A gratitude rock is a small keepsake or memento, and the idea is that when you touch it or see it, you take a moment to feel gratitude and say thanks. You can keep it in your pocket, your purse, in the console of your car, the table in your entranceway where you drop your keys when you walk in the door, anywhere that works. And of course, this doesn’t need to be an actual rock! It can be a small figurine, your key chain, anything that works for you to initiate those thankful thoughts.

Consistently acknowledging and appreciating the people who make a difference in our lives

Sometimes we feel gratitude towards someone for doing a special something for us, or just for being who they are. Instead of keeping this feeling within, why not take a moment to express this gratitude, and let them know we appreciate their presence? As William Arthur Ward said, “Feeling gratitude and not expressing it is like wrapping a present and not giving it.” This can be in the form of a phone call, a quick email or text, or even taking the time to write a thank you note or card. And by the way, acknowledging the people who make a positive impact in our lives includes appreciating yourself!

It seems as though we could all benefit from counting our blessings and adopting an attitude of gratitude! So, as we celebrate Thanksgiving this year, what are you thankful for?

Happy Thanksgiving from Mountain Trek!


What is Mountain Trek?

Mountain Trek is the health reset you’ve been looking for. Our award-winning health retreat, immersed in the lush nature of British Columbia, will help you detox, unplug, recharge, and roll back years of stress and unhealthy habits. To learn more about the retreat, and how we can help you reset your health, please email us at info@mountaintrek.com or reach out below:

Have a ball with Mountain Trek’s top 5 exercise ball routines

women on an exercise ball

If you’re feeling the need to get back in shape, or in better shape for the Fall season, a simple and effective starting point is to try some routines with an exercise ball. Whether you want to improve your cardio for the hiking or biking trails, revitalize your endurance or just feel like you want to tone-up, then strengthening your core muscles is the first essential step.

Core muscles are crucial for stability and good posture but are sadly overlooked when exercising with exercise machines typically found in gyms. The body responds to the instability of a ball on a minute level by trying to remain balanced, thereby engaging many more muscles than if you were to just use fixed equipment.

How to find the right exercise ball for you

The best thing about ball exercises is you don’t need any expensive equipment – just a good quality ball filled with air. However, some ball exercises will require you to equip yourself with a pair of dumbbells or a workout bench, depending on how serious you want to get.

Constructed of soft, elastic material (usually plastic), most balls range in diameter between 14 to 35 inches (35 to 85cm). In order to size an exercise ball to your body correctly stand next to it and it ensure it is even with, or slightly above, your knee level. Alternately, sit on it and ensure your knees are bent at a 90-degree angle and your thighs are parallel or even with the floor.

The best exercise ball routines

1. Ball push-up (feet up)

Set your quads on top of the ball far enough forward so that your pelvis is not touching the ball. In this position begin sets of regular push-ups. Using an exercise ball allows you to target the core muscles on top of the usual chest and triceps muscles. Also this lets you concentrate on your upper pectoral muscles since you’re essentially in an incline workout position.

2. Ball Sit-up

From a squat position in front of the ball (back to ball), gently ease back onto the ball. Your bum and lower back should be resting on the ball. In this position (with hands behind your head) begin sets of sit-ups, leaning back and curving over the ball as far as is comfortable, and raising to about a 45-degree angle. This exercise mainly targets the abdominal muscles but it is also very effective at working other core muscles. Specifically, it will allow you to exercise the upper abdominals as well as the hips muscles.

3. Ball squat (one-legged)

Standing about a foot and a half in front of the ball with your back to it, place the top of your foot/shin onto the ball behind you. Lower yourself so that your front thigh comes to a 90 degree angle to the floor. Then raise to standing again. Repeat a number of times and switch legs. The Ball Squat will primarily target your quadriceps as well as your buttocks. Doing the squat using an exercise ball will make sure you develop stabilizing muscles in your thighs as well.

4. Ball arm-leg extension (alternating)

Drape your belly and chest over the top of the ball. Your feet should be touching the ground. Engage your core muscles by gently lifting your head to a level position with the floor. From here keep your core engaged while lifting one leg and opposing arm (e.g. right leg, left arm) to about a 90-degree angle to the floor. Repeat a number of times and switch legs/arms. This is an excellent exercise that will target most of the muscle groups in your body, specifically your upper and lower back muscles as well as your hamstrings and your buttock muscles.

5. Ball jack-knife

Place the tips of your toes on top of the ball. Position your arms (in a push-up position) about two feet in front of the ball. Roll the ball towards your upper body, with your bum jack-knifing up into the air (almost like a starting sprint position). Bend slightly at the elbows during each roll forward of the ball. This exercise is an excellent way to target your abdominal muscles and your hips but it’s important you to maintain good upper body posture (keep your back and arms straight).

Proper technique

It’s very important to maintain proper body posture when doing a routine with an exercise ball. This means keeping your back straight and preventing your knees from locking. Also, remember to breathe properly – being aware of one’s breathing process is essential to obtaining good results when training with exercise balls. And, as always, make sure to warm up before engaging in demanding physical activity.

In order to ensure perfect technique, consider having an experienced trainer help you with your first few exercises. Or, join Mountain Trek for our reboot and prevention program and let our expert fitness instructors guide you through their favourite ball exercises and routines– a perfect compliment to all the beautiful hikes you’ll be going on!

[fbcomments]


Foam Rolling: Bona Fide or Passing Fad?

Foam Rolling for Fitness

Ten years ago you’d be hard pressed to find a selection of foam rollers at your local gym. A two-foot-round piece of blue foam might have left some athletes, coaches and physiotherapists scratching their heads wondering exactly what it was to be used for.

Today, nearly every elite level training facility, physio clinic, and neighbourhood gym contains an array of foam rollers in varying lengths and consistencies. The question is, is foam rolling a legitimate therapeutic technique or a flash-in-the-pan?

What is a foam roller and how is it used?

A foam roller is a cylindrical piece of hard-celled foam, available in a range of shapes and sizes, that can be used as a self-massage tool. Athletes, gym-goers or patients can use a roller to administer pressure to sensitive areas in the muscles – whether it’s applying sweeping strokes to the long muscle groups like the calves, adductors and quadriceps or concentrating minute directed force to areas like the hip rotators, gluteus medius and tensor fascia latae, the muscle that attaches to the IT Band. Your therapist or trainer may call these sore areas “knots,” “trigger points,” or simply areas of increased muscle density. Regardless of the name, those in the fields of athletics and rehabilitation know that in order to improve performance, sore muscles need massaging.

What started the foam roller craze?

For years chiropractors and physical therapists working with elite athletes have focused on injury prevention and the treatment of muscles by using soft tissue mobilization (massage) and muscle activation and release techniques. Results spoke for themselves and soon it was mandatory that professional athletes have a team of muscle manipulators in their corner. Of course, not everyone is a professional athlete, or can afford a personal trainer, so the question arose: “How can I benefit from soft tissue massage at a reasonable cost?” Enter Mike Clark, physical therapist and CEO of the National Academy of Sports Medicine in the USA. He is credited by many for introducing the athletic and physical therapy communities to the foam roller and what he termed “self myofascial release.” Simply put, he convinced the masses to “self massage” by getting a foam roller and using your bodyweight to apply pressure to sore spots.

What are the major muscle areas that respond well to foam rolling?

• Gluteus Maximus and Hip Rotators: sitting on the roller with a slight tilt and moving from the iliac crest to the hip joint, addresses the gluteus maximus muscles. To concentrate on the hip rotators, the affected leg is crossed to place the hip rotator group on stretch.

• Tensor Fascia Latae and Gluteus Medius: Although small, these muscles are significant factors when experiencing anterior knee pain. To address the TFL, begin with the body prone and the edge of the roller placed over the TFL, just below the iliac crest. After working the TFL, turn ninety degrees to a side position and work from the hip joint to the iliac crest to address the gluteus medius.

 • Adductors: the adductors are one of the most neglected areas of the lower body. The easiest method for working the adductors is a floor-based technique where you abduct the leg over the roller and place the roller at about a 60 degree angle to the leg. The rolling action should be done in three portions beginning just above the knee in the area of the vastus medialis and pes anserine. Ten short rolls should be done covering about one third the length of the femur. Next the roller should be moved to the mid-point of the adductor group and again rolled ten times in the middle third of the muscle. Lastly, the roller should be moved high into the groin, almost to the pubic symphysis.

Things to remember

  • Foam rolling can be hard work, particularly for weaker or overweight people, as the arms are heavily involved in moving the body.

  • Rolling can border on painful at first. If you feel a “sharp” or knife-like pain, however, stop immediately. Rest and then try again with lighter pressure.

  • Foam rollers are available in a number of densities from relatively soft foam, (slightly harder than a pool noodle), to newer high-density rollers with a much more solid feel.

  • The feel of the roller and the intensity of the self-massage work must be properly geared to the age, and fitness level of the client.

  • Good massage work, and correspondingly good self-massage work, may be uncomfortable, much like stretching.

  • It is important that you learn to distinguish between a moderate level of discomfort related to a trigger point and a potentially injurious situation.

  • Foam rolling should be used with discretion in those clients with less muscle density. And it should never cause bruising.

  • The reality is that you should feel better, not worse after using a foam roller.

If you have tight, sore muscles after your hike or workout, you might want to explore what a foam roller can do for you. They’re a small investment (prices start at $20) but can potentially decrease the number of soft tissue injuries one experiences.

Alternatively, join us at Mountain Trek where our staff will show you how to utilize a foam roller properly and set you on a path to overall wellness.

[fbcomments]

14 Hacks To Ensure the Best Travel/Trek Experience Ever

geisha in a yellow field holding a paper craneWhen Mountain Trek visited Peru last Spring, we found the following list in one of the beautiful lodges we stayed at. It includes 14 tips for ensuring you have the best travel and trekking experience ever. We thought there was some good wisdom in it that should be shared, especially now that we’re offering pre-registration for our 2014 Spring Hiking Vacation in Japan. On that trip we’ll be exploring the Tokaido (the traditional path of the Shogun), the Shikoku Temples, the world-famous vine bridges and we’ll be relaxing in Onsens every night. (An Onsen is a traditional hot spring accommodation.) Click here and tick the box at the bottom of the page if you would like more information regarding our Japan adventure in 2014.

In the meantime, enjoy these poignant pieces of advice and think of them when you pack your bags to explore the beauties of your own country or to travel around the world.

Travel lightly

You are not travelling for people to see you

Travel slowly

Jet planes are for getting places, not seeing places: take time to absorb the beauty and inspiration of a mountain or temple.

Travel expectantly

Every place you visit is like a surprise package to be opened. Untie the strings with an expectation of high adventure.

Travel hopefully

“To travel hopefully is better than to arrive,” wrote Robert Louis Stevenson.

Travel humbly

Visit people and places with reverence and respect for their traditions and ways of life.

Travel courteously

Consideration for your fellow travellers and your hosts will smooth the way through the most difficult days

Peru Adventure Trek

Peru Adventure Trek

Travel gratefully

Show appreciation for the many things that are being done by others for your enjoyment and comfort.

Travel with an open mind

Leave your prejudices at home.

Travel with curiosity

It is not how far you go, but how deeply you go that mines the gold of experience. Remember that Thoreau wrote a big book about the very tiny Walden Pond.

Travel with imagination

As the Spanish proverb goes, “He who would bring home the wealth of the Indies must carry the wealth of the Indies with him.”

Travel fearlessly

Banish worry and timidity; the world and its people belong to you just as you belong to the world.

Travel relaxed

Make up your mind to have a good time and let go.

Travel patiently

It takes time to understand others, especially when there are barriers of language and custom. Keep flexible and adaptable to all situations.

Travel with the spirit of a world citizen

You’ll discover that people are basically much the same the world around. Be an ambassador of good will to all people.

Cherry Blossoms in Japan+ 6 Bonus Tips:

  • Always pause, at least for 15 seconds and take it all in. The destination is only as beautiful as the journey.
  • Make an effort to associate your feelings of peace and tranquility with a landmark on the trip. This will come in handy when you are back home.
  • Think about your loved ones. If you are with them, share and bond. If they are not with you, lend them your senses.
  • Learn with every footstep, every word, every sense.
  • Look up at the sky at night at least once. Try to understand how ancient civilizations guided themselves by this.
  • Let go, at least once during your trip. Do something you would not normally do.